Search for a 4K or UHD upscaler and you’ll find many desktop apps that promise sharp 4K in one click. For home videos or social clips, they often do a decent job. A film archive, a broadcaster or a studio preparing a library for streaming has a harder job. A bad upscale isn’t just ugly. It can be rejected at delivery, or it can quietly damage the look of a title audiences love.
At professional level, 4K video upscaling is a workflow with three stages: assessment, processing and quality control. Each stage has a clear job, and skipping one usually shows up in the final picture.
Who needs a production upscaling workflow?
A professional workflow matters most when the content has long-term value. For example:
- Film libraries and studios re-releasing older titles on streaming platforms
- Broadcasters moving SD or HD archive programmes into UHD channels or catch-up services
- Archives and institutions creating access copies of historic material
- Content owners selling or licensing a catalogue, where picture quality affects the deal
In all of these cases, the upscaled file becomes the new master. It may be used for years, so it needs to be right the first time.
Why one click isn’t enough
Upscaling adds pixels, but it can’t bring back detail the original never recorded. AI models fill the gaps by predicting what “should” be there. On clean, well-shot footage this can look excellent. On grainy film transfers, interlaced tape or heavily compressed files, the same tool can produce:
- Waxy, plastic-looking skin
- Invented textures in hair, fabric or backgrounds
- Shimmering or “crawling” edges
- Film grain that is smeared away or turned into noise
A one-click workflow may rely on automated settings that do not adequately account for the specific condition and characteristics of every title. Professional projects may therefore require source assessment, tailored processing and additional quality control.
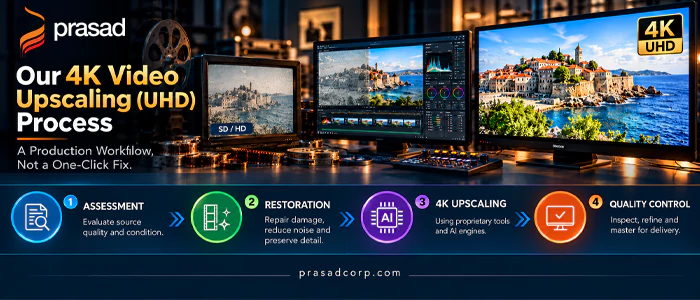
Stage 1: Assessment
Before any processing, the source has to be checked:
- Source Evaluation: What is the best source available? If the original film elements are available and in suitable condition, a fresh 4K scan may capture more genuine detail than upscaling an older SD or HD master. The best approach depends on the condition of the film, the quality of the existing master and the project’s delivery requirements.
- Condition Audit: What condition is it in? Dust, scratches, noise and tape dropouts should be handled first. Older material held on tape needs to be digitized properly before any of this; that is where tape digitization comes in. Digital film restoration is often the step before upscaling.
- Pipeline Mapping: Upscaling using proprietary workflows leveraging state of the art restoration techniques including AI engines.
- Color Strategy: Colour grading as that is a part of the workflow.
- Delivery Alignment: Where is it going? A streaming platform, a broadcaster and a cinema each have their own technical specs, and 4K for TV and streaming isn’t the same size as 4K for cinema. The target decides the settings.
Older material held on tape needs to be digitized properly before any of this. That is where tape digitization comes in.
Stage 2: Processing
Upscaling is usually done step by step rather than in one big jump. Prasad’s Format Conversion services cover SD to HD, HD to 2K and 2K to 4K, so each title can move up the resolution ladder at the level its source can support.
At this stage, the aim is to keep the original look, not to create a new one. Film grain, the cinematographer’s lighting and the colour of the original release should all survive. If a title is also moving to HDR, that is a separate creative step, best handled through HDR colour grading rather than left to an automated tool.
Stage 3: Quality control
This is the stage that most separates a production workflow from a desktop app. Every upscaled file needs to be checked before it goes out, for artifacts, flicker, edge problems, audio sync and compliance with the delivery spec.
Broadcast bodies treat file-based QC as a discipline of its own. The European Broadcasting Union, for example, has published a shared set of QC criteria so broadcasters can check files in a consistent way. Prasad’s Mastering and QC and Video QC services handle this inspection and correction, followed by mastering into the formats each platform requires.
A simple way to think about it
| One-click 4K upscaler | Production upscaling workflow | |
|---|---|---|
| Source check | None | Best source chosen first; rescan if film exists |
| Clean-up | Usually none | Restoration before upscaling |
| Settings | Same for every frame | Matched to source and destination |
| Quality check | You watch it yourself | Formal QC before delivery |
| Output | A bigger file | A master ready for delivery |
Frequently asked questions
1. Can 4K video upscaling turn SD footage into true 4K?
2.Should I upscale or rescan my film?
3. Is a desktop 4K upscaler good enough for broadcast or streaming delivery?
A 4K upscaler is a useful tool, but for a film or broadcast library it is only one step. The real value comes from choosing the right source, cleaning it first, upscaling with care and checking every frame before delivery.
If your library is moving to 4K, talk to Prasad’s team about upscaling, restoration and QC for your content.